
WIP – Dodge Challenger R/T 1970: Rims, tires, brake system
The last few hours I’ve been working on the rims and the braking system. That was some challenging stuff… But I think it’s okay now, here are the pictures:


bb
WIP – Dodge Challenger R/T 1970: Headlights, muffler & air outlet grills, backlights
A very short update again:

Before the Angel Eyes consisted of torus with a grooved displacement map and another torus with a glass material assigned. But since the displacement map was blurry and distorted (the reason for this was the VRayDisplacementMod), I decided to model the grooves in the mesh. That was much more precisely. But I’m not quite satisfied with the look at the moment. I’ll have to tweak with the material settings again to get a more realistic look.

The air outlet grill consists of three planes, one for the frame and two for both grills. The grills are boolean objects (yes, right..), I scattered the visible cylinder via the MultiScatter plugin regularly over the surfaces and subtracted them from the planes. And since a plane is a 2D object with only one surface, the holes have no depth. But I was thinking that regarding the polycount, this is a justifiable compromise.


I’m unhappy with the backlights, they look too loveless compared to the rest of the car. But it’s a challenge to model them with the goal of illuminate them realistically. I’ll have to spend a little time here.

The muffler outlet grill is built with the same technique as the air outlet grill, no further words here.
bb
bb goes Arch-Viz
Hi all
I have the great opportunity to finally get professional with 3d design!

Starting the 04.01.13 I’m going to work in the architectural visualization field at Optasia 3d, a local interior and exterior designer. I’m very glad about that happening since I want to get professional in 3d for a long time now. It is possible, that I’m going to decrease private 3d activities a little but I’ll keep you updated.
bb
WIP – Dodge Challenger R/T 1970: Headlights, hood pins, windows, material tests
Progress at creating details. The headlights and hood pins are fully modelled. The windows are created as well but I’m not very happy with them, in the reflexions of the side windows are some distortions visible which I intend to smooth out.
Further I made a couple of material tests trying to evaluate an accurate car paint. The white one is made with a VRayMtl and the orange one with VRayCarPaintMtl. Working with the ladder is very easy and the results are respectable. The color isn’t definitive, I just didn’d want to render a white car all the time.. 😉


bb
WIP – Dodge Challenger R/T 1970: Front and roof
A short update:
I didn’t have much time recently so I only modelled the roof and the front including headlight mask and comb grill. Further I refinded the whole mesh to get rid of smoothing issues.
Polycount: 41.000!


bb
Helpful sites with information about spherical HDRIs
I’ve recently been looking for information about how to create spherical HDRIs and I found two very detailed which I’d like to share with you:
________
Technical and very precisely information about creating spherical HDRIs including Camera aspects, equipment, tips and tricks:
________
Information about the quality of availabe HDRIs. How to verify the quality by means of by the publisher shared rendered scenes:
________
I hope you find the sites as useful as I did.
bb
WIP – Dodge Challenger R/T 1970: Car body
The polycount is increasing and increasing..
Actually 2200 Polys raw.
And here are a few detail renders made with vray.


bb
Launch: WIP – Dodge Challenger R/T 1970
Yes, another work in progress! 🙂
I want to increase my capabilities in car modelling because this is one part in 3D design that I would really like to do professionally. Therefore I will raise my portfolio with another car model. This time it’s going to be a 1970 Dodge Challenger R/T! I’ve thougt about which car it would be the whole day. First I wanted to create a Dodge Magnum, then a VW Käfer but at last I’ve decided to build the Challenger because I really like it (the 2008 version as well) and I could be sure that I would find high quality blueprints for that car.
The blueprints are gratefully taken from the-blueprints.com.
I started with the side part of the car. In the side view I created a plane and added vertices until I was able to shape the car’s silhouette. Then I refined the mesh and added details like the characteristic edge flowing in driving direction, the seam of the driver’s door or the wheel-arch.
Beneath the actual stage of the side part. There are a few smoothing issues in the section of the rear wheel-arch and poor mesh at the door’s corners which I intend to correct.

side part wire

Challenger front view

Challenger rear view
I’m motivated for this project. Anorganic form, hard edges and no fur at all.. 😉
bb
WIP – Dan the Santa Mouse: Aborting WIP
As you may have realized, I haven’t been able to finish Dan until Christmas. That’s a pity but the Fur fumbling was a very time-consuming work and I haven’t finished it even yet. I’m aborting the WIP here because Christmas is over and it was a theme-related project. Maybe I’m going to revive Dan next Christmas, who knows…
Here is a picture with the stage from a few weeks ago. Unfortunately the Fur generated with Ornatrix has deleted itself, that’s the main reason for the delay.
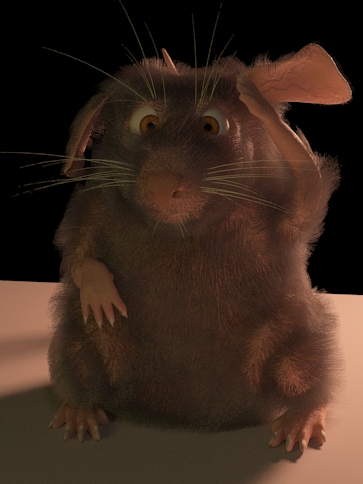
Dan with former Fur
So long…
bb
Short-term diversion: Tron light effects
Usually when I’m watching movies containing excessive CG Effects a big desire grows deep in my heart to recreate one of those scenes on my own. So after watching Tron: Legacy I temporary threw Dan aside and started to design some Tron light effects.
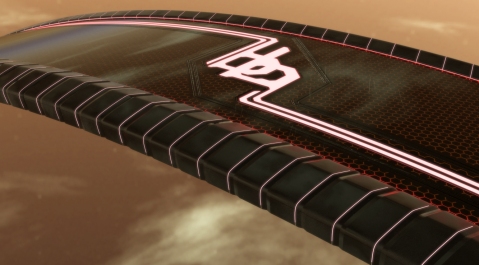
bb Tron light effect
Of course there’s an iPhone 5 optimized version:
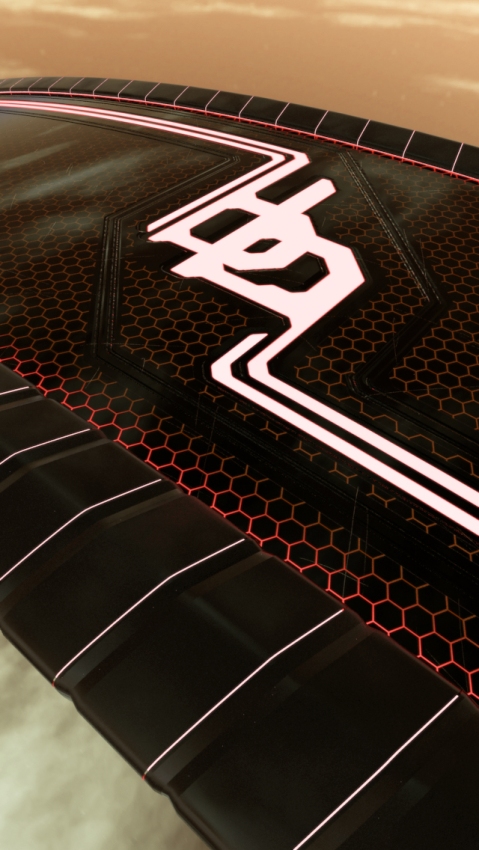
bb Tron for iPhone 5
The method is adopted from Patan77’s short film: I created a plane representing the visible surface, cloned it and moved the duplicate slightly beneath the other. Then I assigned a VrayLightMtl to the bottom plane. By altering the opacity of the upper plane I now was able to control where the light from the bottom plane shined through. In white parts of the map the plane is fully transparent, means that the full amount of light from the bottom plane is visible. In black parts the plane is fully opaque, no light visible. The hexagon pattern doesn’t emit light, it’s contained only in the diffuse map.

bb Tron opacity map
All maps were created in Illustrator. I also generated maps for the diffuse, displacement and reflection channel and a scratchy texture for the bump channel.
The sky HDRI image is distributed by just-Nate. Thanks!
bb
